
Most people who lose money in the market don't lose because they picked the wrong stock. They lose because they bet too much on the right idea at the wrong moment, got knocked down, and never got back up. This guide is about the one skill that stops that from happening to you: position sizing — deciding how much to put into a trade before you ever press the button.
It's not glamorous. Nobody posts screenshots of their position-sizing spreadsheet. But it is, quietly, the single most important thing separating traders who are still here in five years from the ones who blew up in five weeks. Let's learn it from zero.
What Position Sizing Actually Is (In Plain English)
Let's define the term before we use it a hundred times.
A "position" is simply the trade you're holding. If you buy 100 shares of a company, your position is 100 shares. If you buy 3 shares, your position is 3 shares. The word just means "the thing you currently own in the market."
"Position sizing" is the decision of how big that position should be. Not what to buy — that's a different question. Not when to buy — different question again. Position sizing answers only this: "Now that I've decided to make this trade, how much money do I put on the line?"
Here's the analogy that makes it click. Imagine you're crossing a series of streams on stepping stones. Picking the right stock is choosing which stones to step on. Position sizing is deciding how hard you push off each one. Step too gently and you don't get anywhere. Push off with your entire body weight on a wobbly stone, and one bad stone sends you into the water — game over, no more crossing. Good sizing is calibrating your weight to how solid the stone is, every single step.
The key mental shift for a beginner is this: position sizing is not about how much you want to make. It's about how much you can afford to lose. That backwards-feeling idea is the whole game. Beginners think in terms of upside ("if this doubles I make..."). Professionals think in terms of downside first ("if this goes against me, what do I lose, and can I take that hit and keep trading?").
We're going to teach you to think like the second group starting today.
Why a Complete Beginner Should Care (Maybe More Than Anyone)
You might be thinking: I'm just starting with a small account. Why does sizing matter for me?
It matters most for you. Here's the brutal math that nobody explains on day one.
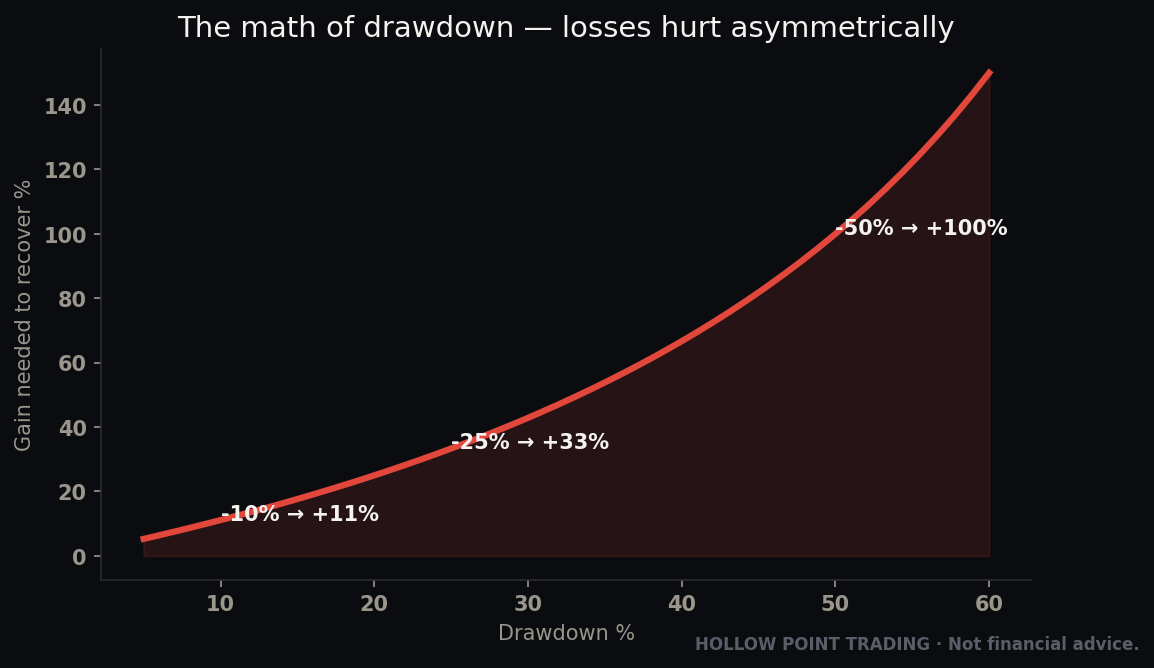
When you lose money, you don't need to make back the same percentage you lost — you need to make back more, because you're now working with a smaller pile. Watch:
- Lose 10% of your account. To get back to even, you need to gain about 11%. Annoying, but survivable.
- Lose 25%. You now need to gain about 33% to break even.
- Lose 50%. You need to double your money — a 100% gain — just to get back to where you started.
- Lose 90%. You need a 900% gain to recover. That basically never happens.
This is called the "asymmetry of loss," and it's a mathematical fact, not an opinion. Smaller losses require smaller percentage gains to recover, but recovery is never assured. Position sizing sets a planned risk budget; it cannot guarantee the size of an actual loss.
There's a second reason, and it's about your brain. A trade sized too big doesn't just threaten your money — it hijacks your decisions. When you've bet more than you can stomach, you stop thinking like an analyst and start reacting like a scared animal. You close winners too early because you can't handle the swings. You hold losers too long because taking the loss feels unbearable. Oversized positions make you stupid, and no strategy survives a stupid operator. Correct sizing keeps you calm, and calm keeps you rational.
At Hollow Point Trading, the first commandment is protect capital first. You cannot trade tomorrow if you don't survive today. Position sizing is how you protect capital. Everything else — the charts, the setups, the indicators — is secondary to staying in the game.
The Core Idea: Risk a Little to Make a Lot
Before the rules, absorb the philosophy, because the rules only make sense on top of it.
Every trade has two outcomes you need to define before you enter:
- Your risk — the amount you lose if the trade goes wrong and you get out at your planned exit.
- Your reward — the amount you gain if the trade goes right and hits your target.
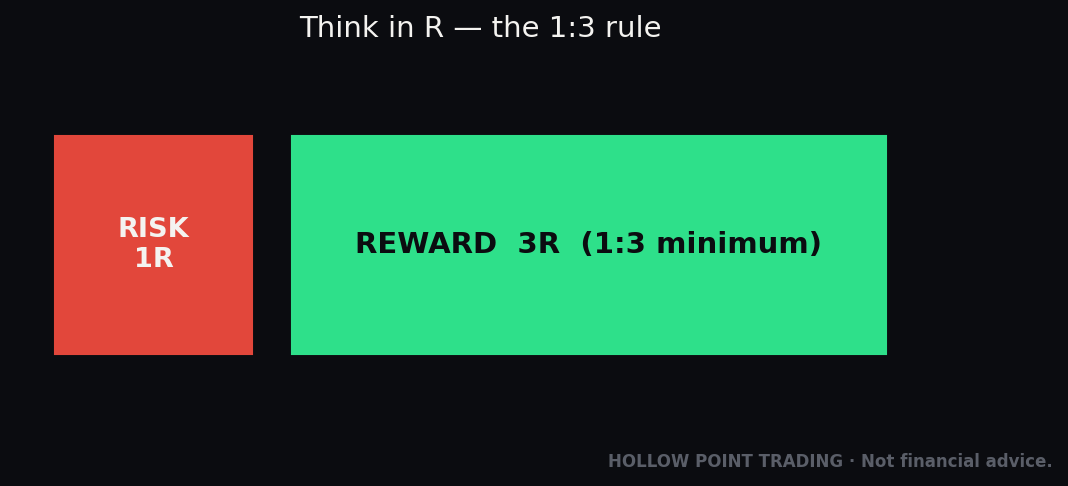
The relationship between these two is called the reward-to-risk ratio (you'll also hear "R/R" or "risk-reward"). If you're risking $100 to potentially make $300, that's a 1:3 reward-to-risk — one unit of risk for three units of reward.
Hollow Point Trading builds around a minimum 1:3 on every trade. Here's why that number is so powerful, and it connects directly to sizing. If every trade risks the same small amount and aims for at least triple that, you can be wrong more often than you're right and still make money.
Watch this. Say you take 10 trades, risking $100 each, aiming to make $300 each. You're wrong 6 times and right only 4 times — a losing record most people would be ashamed of:
- 6 losses × $100 = –$600
- 4 wins × $300 = +$1,200
- Net result: +$600 profit
You lost more trades than you won and you still came out ahead. That is why sizing beats being right, and we'll return to that idea in full later. But notice what makes the math work: every loss was the same small, controlled amount. The moment one of those losses balloons to $600 because you sized wrong, the whole beautiful system collapses. Sizing is what keeps the "$100" in "risking $100" honest.
The 1% Rule: Your Training Wheels (And Maybe Forever Wheels)
Here's the single most important rule in this entire guide, and it's simple enough to write on your hand:
Never risk more than 1% of your account on a single trade.
Let's unpack every word, because each one is doing work.
"Risk" here means the amount you'd actually lose if the trade goes against you and you exit at your pre-planned stop. It does not mean the amount you invest. This trips up every beginner, so read it twice: risking 1% is not the same as buying with 1% of your account. You might invest 20% of your account into a position but only risk 1% of it, because your exit is close by. We'll do the full math on this in a minute — it's the heart of the whole skill.
"1%" is the ceiling. On a $5,000 account, 1% is $50. That is the planned risk budget for the example, not a guaranteed maximum loss. On a $10,000 account, it's $100. On a $1,000 account, it's $10.
A 1% planned risk budget can reduce exposure, but it does not make a trade safe. Ten losses of exactly 1% of the remaining balance would compound to about 9.6%, before fees. Actual losses may exceed the plan because of price gaps, slippage, leverage or execution problems. Several correlated positions can also lose together; a per-trade rule does not cap total portfolio risk.
Many beginners are better off starting even smaller — at 0.5% — while they're still learning and making rookie mistakes. There's no rule that says you must use the full 1%. Think of 1% as the maximum, not the target. The best traders are almost always risking less than they're allowed to.
Why not risk more to get rich faster? Because "faster" cuts both ways. If risking 1% means one bad streak costs you 10%, then risking 10% means one bad streak ends you. The market will absolutely hand a beginner a losing streak in their first months — that's not pessimism, it's near-certainty while you learn. The 1% rule is the seatbelt that turns those inevitable crashes into fender benders instead of funerals.
How It Actually Works: Sizing Off Your Stop, Step by Step
Now the practical skill. This is where "1% rule" turns into "how many shares do I actually buy." We need one more term first.
A "stop-loss" (or just "stop") is a pre-decided price where you'll exit a losing trade to prevent it from getting worse. It's the escape hatch you install before you get in. If you buy a stock at $100 and set your stop at $95, you're saying: "If this drops to $95, I'm out, no arguing with myself." The stop gives you a reference for planning risk, not a guaranteed execution price. A standard stop becomes a market order when triggered; a gap can produce a worse fill. A stop-limit order controls the acceptable price but may not execute. See the SEC investor guide to order types.
Here is the magic relationship at the center of position sizing:
Your stop distance decides your position size.
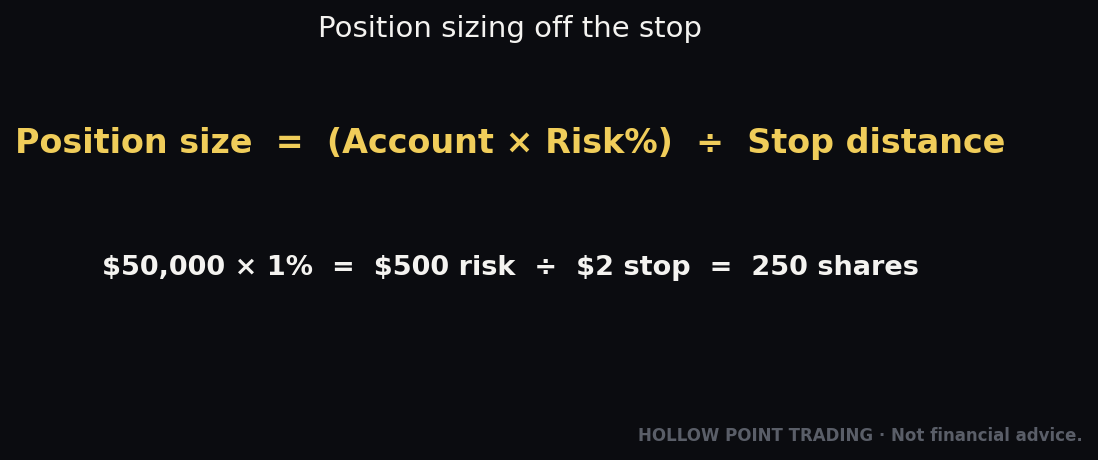
The closer your stop is to your entry, the more shares you can buy for the same dollar risk. The farther your stop, the fewer shares. Your risk in dollars stays fixed at 1%; the number of shares flexes to fit. Let's build the formula slowly.
Step 1 — Find your account risk in dollars. Take your account size and multiply by 1% (0.01). Example: $10,000 account × 0.01 = $100 of risk allowed.
Step 2 — Find your risk per share. This is the distance from your entry price to your stop price. Example: You buy at $50, your stop is at $48. Risk per share = $50 − $48 = $2 per share.
Step 3 — Divide. Number of shares = (dollars you're allowed to risk) ÷ (risk per share). Example: $100 ÷ $2 = 50 shares.
In this simplified example, buying 50 shares and exiting at exactly $48 produces a $100 loss before fees. That is the planned 1% risk. A lower exit price, slippage or costs would increase the actual loss.
Let me show you the flex in action, because this is the part that makes people finally get it. Same $10,000 account, same $100 risk budget, but different stop distances:
- Stop is $1 away (tight): $100 ÷ $1 = 100 shares.
- Stop is $2 away: $100 ÷ $2 = 50 shares.
- Stop is $5 away (wide): $100 ÷ $5 = 20 shares.
- Stop is $10 away (very wide): $100 ÷ $10 = 10 shares.
In every case, the planned loss is $100 if the exit executes at the assumed stop price, before costs. The share count changes with the stop distance. This is a planning calculation, not a cap on actual loss; account for liquidity, gaps, fees and possible slippage.
This solves a problem beginners don't even know they have. A wide stop isn't "riskier" if you size correctly — you just buy fewer shares. A tight stop lets you buy more. The sizing formula automatically balances it so that your dollar risk is identical either way. Sizing down can reduce exposure, but a wider stop does not make a setup safe. Skip a trade when its liquidity, leverage or potential gap risk exceeds your limits.
A Fully Worked Beginner Example, Start to Finish
Let's walk one complete trade the way you'd actually do it Monday morning. Meet a beginner named Sam.
Sam's account: $3,000. Small, real, typical of someone just starting.
Step 1 — Sam's risk budget. $3,000 × 1% = $30 of planned risk, assuming the intended exit price and excluding costs. Sam could lose more if the exit fills at a worse price.
Step 2 — Sam finds a setup. Sam has decided (through his own analysis — a separate skill) that a stock called, say, RiverTech looks strong at $40 a share, and that if it falls to $37, his idea is proven wrong and he should be out. So:
- Entry: $40
- Stop: $37
- Risk per share: $40 − $37 = $3 per share.
Step 3 — Sam sizes the position. $30 risk budget ÷ $3 per share = 10 shares.
Sam buys 10 shares of RiverTech at $40, spending $400 of his $3,000. Notice: he invested $400 (about 13% of his account) but is only risking $30 (1%). This is the distinction from earlier made concrete — amount invested and amount risked are completely different numbers.
Step 4 — Sam sets his reward target using 1:3. Sam risked $3 per share. For a 1:3 reward-to-risk, he wants to make $9 per share ($3 × 3). So his target is $40 + $9 = $49.
- If RiverTech hits $37 (stop): Sam loses 10 × $3 = $30. A 1% dent. He shrugs and moves on.
- If RiverTech hits $49 (target): Sam makes 10 × $9 = $90. A 3% gain. Three times what he risked.
Step 5 — Sam lets the trade play out without touching it. Because he's only risking 1%, Sam sleeps fine. The position isn't big enough to make him panic-sell on a dip or greedily hold past his target. His sizing bought him something priceless: calm.
Now zoom out. Suppose Sam does this exact process on 10 trades, wins only 4 of them, and follows his 1:3 every time:
- 6 losses × $30 = –$180
- 4 wins × $90 = +$360
- Net: +$180, or a 6% account gain — while being wrong 60% of the time.
Sam isn't a genius. Sam is disciplined. That's the entire lesson, lived out in one worked example.
Why Sizing Beats Being Right
This deserves its own section because it's the idea that rewires how you see trading forever.
Beginners obsess over their win rate — the percentage of trades that make money. They want to be right. It feels good to be right. But being right is a trap when it's not paired with sizing, and here's the proof.
Imagine two traders. Both take 10 trades.
Trader A is a fantastic stock-picker. She's right 8 out of 10 times — an 80% win rate most people would kill for. But she has no sizing discipline. Her wins are small because she takes profit nervously (+$50 each), and her two losses are huge because she has no stop and lets them run (–$500 each).
- 8 wins × $50 = +$400
- 2 losses × $500 = –$1,000
- Net: –$600. She was right 80% of the time and lost money.
Trader B is a mediocre picker. He's right only 4 out of 10 times — a 40% win rate. But he sizes every trade to risk $100 and targets $300 (1:3), and he honors his stops like a religion.
- 4 wins × $300 = +$1,200
- 6 losses × $100 = –$600
- Net: +$600. He was wrong most of the time and made money.
Read those two again. The worse picker made money; the better picker lost it. The only difference was sizing and discipline. The market does not pay you for being right. It pays you for managing risk. You can build a winning career on a coin-flip win rate if your losses are always small and your wins are always bigger. You can go broke with a brilliant win rate if a single oversized loss erases fifty good calls.
This is why, at Hollow Point Trading, we say discipline over prediction. Prediction is trying to be Trader A. Discipline is choosing to be Trader B. One is a fantasy of control over an unknowable future; the other is a repeatable process you fully control. Position sizing is where discipline lives.
The Beginner Mistakes to Avoid
Every one of these is a lesson someone learned the hard way. Learn them the easy way instead.
Mistake 1 — Confusing amount invested with amount risked. The rookie hears "risk 1%" and buys with 1% of their account — a tiny, pointless position — or, worse, hears "only risk 1%" and dumps their whole account into one stock thinking the stop protects them. Neither is right. You size the shares so that the distance to your stop equals 1% of your account. Invested dollars and risked dollars are different animals. Master this one and you're ahead of most beginners.
Mistake 2 — Trading without a stop at all. No stop means no defined risk, which means position sizing is impossible — there's no "risk per share" to divide by. A trade without a stop isn't a trade; it's a hope with your money attached. Always know your exit before you enter.
Mistake 3 — Moving your stop down to avoid taking the loss. The price approaches your stop, it hurts, so you tell yourself "I'll give it a little more room" and slide the stop lower. Congratulations — you just secretly increased your position size and blew past your 1% rule. This is how a planned $30 loss becomes a $300 catastrophe. Your stop is a promise. Moving it to dodge a loss is breaking that promise to yourself.
Mistake 4 — "Revenge sizing" after a loss. You lose a trade, you're angry, and you double the size of the next one to "win it back fast." This is the single fastest way to turn one small loss into a blown account. Losses are normal and pre-budgeted. React to them with the same 1% you always use — never more.
Mistake 5 — Sizing by feeling instead of by math. "I really believe in this one, so I'll go big." Conviction is not a position-sizing input. Some of your most-loved trades will fail; some of your meh ones will win. The market doesn't know how confident you feel. Size every trade off the stop and the 1% rule, regardless of how sure you are.
Mistake 6 — Ignoring the cost of trading. Fees, commissions, and the small gap between buy and sell prices (called the "spread") all nibble at tiny accounts. On a $50 target these can matter. It won't change your sizing much as a beginner, but be aware the market isn't friction-free.
Mistake 7 — Forgetting that leverage multiplies the risk you already set. Some products (like futures or margin) let you control more than your cash with borrowed money — that's leverage. Leverage doesn't change the 1% rule; it just makes it easier to accidentally break, because a small price move now equals a big dollar move. As a beginner, treat leverage with enormous caution and keep sizing off your stop exactly as taught. The math still rules; leverage just raises the stakes on getting it wrong.
Your Position-Sizing Cheat-Sheet
Tape this next to your screen. It's the whole skill on one card.
THE FORMULA
Shares to buy = (Account × 1%) ÷ (Entry price − Stop price)THE FOUR STEPS, EVERY TRADE
- Risk budget = Account × 1% (or 0.5% while learning).
- Risk per share = Entry price − Stop price.
- Shares = Risk budget ÷ Risk per share.
- Target = at least 3× your risk per share above entry (1:3 minimum).
THE QUICK REFERENCE (1% of common account sizes)
- $1,000 account → risk $10 per trade
- $2,000 account → risk $20 per trade
- $5,000 account → risk $50 per trade
- $10,000 account → risk $100 per trade
- $25,000 account → risk $250 per trade
THE PRE-TRADE CHECKLIST — answer all five, or don't trade
- [ ] Do I know my exact entry price?
- [ ] Do I know my exact stop price (my "I'm out" line)?
- [ ] Have I calculated my share count from the formula — not guessed it?
- [ ] Is my target at least 3× my risk?
- [ ] Is the dollar I'm risking truly 1% or less of my account?
THE THREE LAWS TO NEVER BREAK
- Never risk more than 1% on one trade.
- Never move a stop to avoid a loss.
- Never size by emotion — always by the formula.
If you do nothing else from this guide, do these three. They will keep you alive.
How This Fits the Bigger Hollow Point Picture
Position sizing doesn't live alone. It's the foundation floor of a building, and it's worth seeing the whole structure so you understand why we started here.
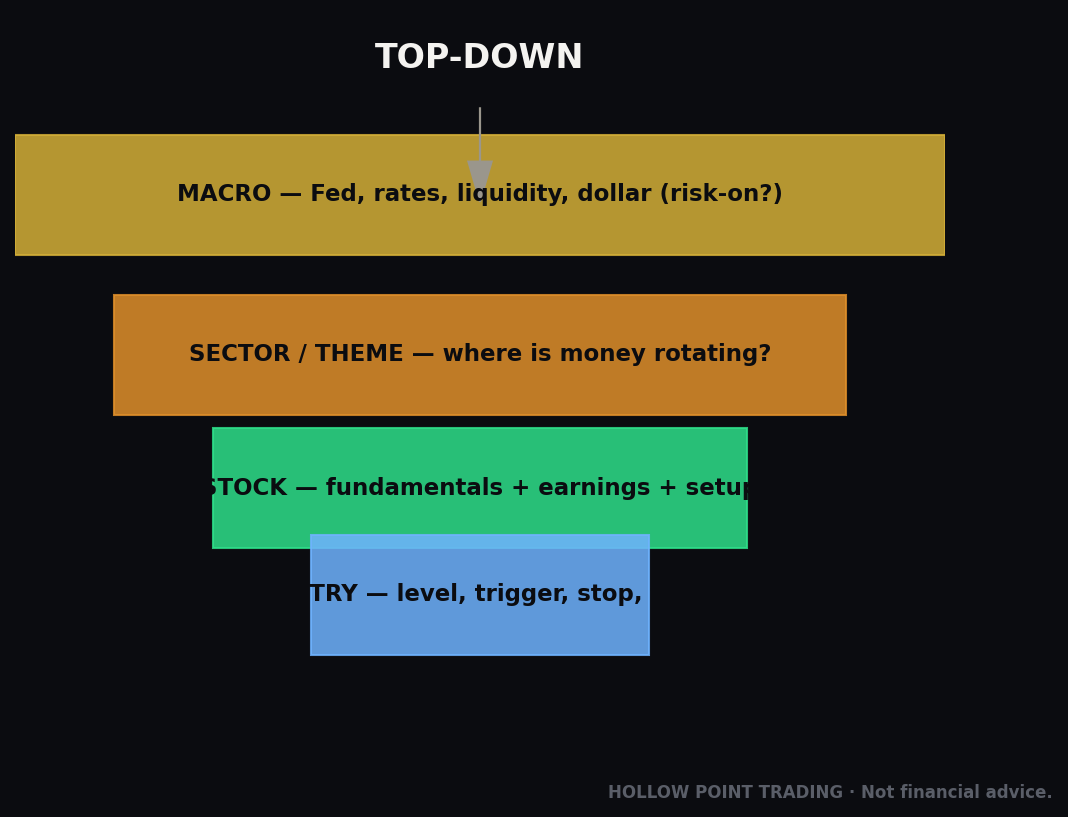
At Hollow Point Trading, we teach a top-down way of seeing markets: macro → sector → stock. You start wide, looking at the overall market environment (the "macro" — is the whole market healthy or scared?). You narrow to the sector — which industries are strong right now? Then you drill to the individual stock — the specific name you might trade. That funnel is how you decide what to trade and when.
But here's the thing — that entire funnel produces the two inputs position sizing needs: an entry (where the setup says to get in) and a stop (where the setup is proven wrong). The macro-to-stock analysis finds you the trade; position sizing decides how much of yourself to commit to it. They're partners. One without the other is incomplete: great analysis with reckless sizing blows up, and perfect sizing on a garbage setup just loses slowly.
The 1:3 reward-to-risk minimum we keep returning to is the bridge between them. Your analysis has to offer at least three units of potential reward for every unit of risk, or the trade isn't worth taking — because, as we proved, 1:3 is what lets you profit while being wrong more than half the time. Sizing sets the "1"; your analysis has to justify the "3."
And underneath all of it sits the oldest HPT law: protect capital first. Not "make money first." Not "be right first." Protect capital. Because the trader with capital left can take the next setup, and the next, and compound small disciplined wins into something real over years. The trader who blew up chasing a big score is out of the game and can't play at all. Position sizing is the mechanism that keeps you in the chair. Every other skill you'll ever learn only pays off if you're still trading when the good setups arrive.
Start here. Master this before you obsess over indicators, patterns, or entries. A beginner with flawless sizing and mediocre analysis will quietly outlast a beginner with brilliant analysis and no risk control — every time, without exception. The market has been proving that for a hundred years.
Size small. Lose small. Win bigger. Survive to trade again. That's the whole job.
Bound by rules, feared by trade.